Never Lose Files: Restore Previous Versions of Files
Restore Previous Versions of Files Using File History
If you want to roll back the changes to a file and restore a previous version, the best way to do it is to use Windows’ own file versioning features. You’ll need to have enabled File History first, which typically uses an external drive (or networked drive in some cases) to store the files.
If File History isn’t enabled, then you may not be able to restore a previous version in Windows 10 unless you’re already syncing your files to cloud storage.
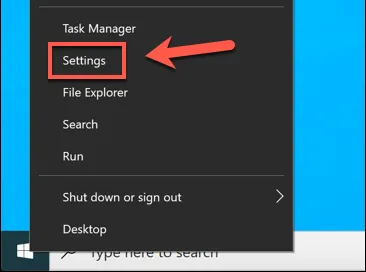
You can check if File History is enabled in the Windows Settings menu. Right-click the Start menu and select the Settings option to begin.
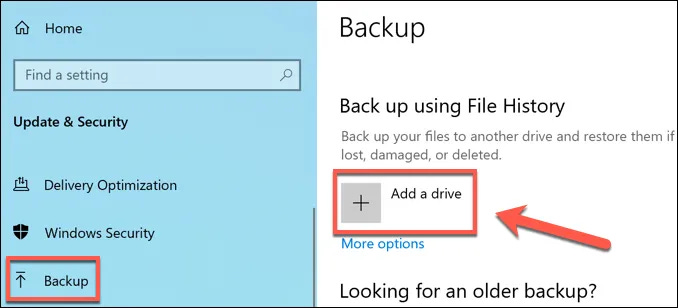
In the Windows Settings menu, select Update & Security > Backup. Underneath the Back up using File History option, the drive you currently use for File History backups will be listed. If one isn’t listed, then you’ll need to enable File History by selecting the Add a drive option.
A list of available external drives will appear in a drop-down menu. Select one of these to enable File History. The Backup menu will update with a slider allowing you to switch File History on and off once you’ve done this. You can select which folders it monitors by selecting More options underneath the slider.
In the More options menu, you can add or remove folders to monitor for File History by selecting the Add a folder option underneath the Back up these folders category.
You can also change how often files are backed up and how often the backups are stored for. To change these settings, change the settings using the Back up my files and Keep my backups drop-down menus.
Once File History is enabled and monitoring the correct folders, you can restore previous versions of files using Windows File Explorer. This will only work for files you edit after File History has been enabled. To do this, open File Explorer and find the file or folder containing the file you wish to restore. Right-click the file or folder, then select the Restore previous versions option.
In the Previous Versions tab of the Properties window, you’ll see a list of previous versions of your file or folder. To view the file or folder, select the version you want to restore from the list, then select the Open button at the bottom. If you want to restore it, select Restore instead.
If you select Restore, the previously saved files will overwrite the new files. To save both copies, select the downwards arrow next to the Restore button first, then choose Restore To instead.
Select a new folder to save the previous versions of your files, then select the Select Folder option.
Windows File Explorer will open to show you the restored files, whether you selected to overwrite the new copies or save them elsewhere instead. This option, as we’ve mentioned, only works if you had File History enabled before you made changes to files.
Unfortunately, there aren’t many options to help you restore previous versions in Windows 10 if you don’t already have a backup system in place. You may have more luck if you deleted the file, however, as Microsoft now offers a Windows File Recovery tool to help recover lost files.
Consider subscribing to receive daily updates with tips!


